Ans: Hire a professional service provider. They will help you refinish a wood floor in the best way possible.

Refinishing Timber Floors: Homeowners' Guide with Key Insights & Complete Overview
Refinishing timber floors is a major maintenance requirement in all types of houses, whether a decent single-story structure or an expensive multi-story bungalow! Over time, the timber flooring becomes dull due to scratches, dents, fading, discoloration, water stains, and other reasons.
Thus, a refinishing work renders the thus-worn-out floor a renewed look. This is a very simple process and doesn’t even take 1 to 2 days to complete when handled by professionals. For more details, consider the following article.
Table of Contents:
- What is Timber Floor Refinishing?
- Why Should You Refinish Timber Floors Instead of Replacing Them?
- How Do You Know When Timber Floors Need Refinishing?
- Can All Types of Timber Floors be Refinished?
- What Tools and Materials are Needed to Refinish Timber Floors?
- How Do You Prepare a Room Before Refinishing Timber Floors?
- What are the Step-by-Step Instructions for Refinishing Timber Floors?
- What is the Best Finish for Timber Floors?
- How Long Does it Take to Refinish Timber Floors?
- How Much Does It Cost to Refinish Timber Floors?
- Is It Better to DIY or Hire a Professional?
- Conclusion
- FAQs
What is Timber Floor Refinishing?

Refinishing timber floors is the process of restoring worn or damaged hardwood floors to their original, pristine condition without removing them.
It is a two-fold procedure, where the old, scratched, or stained sealant is stripped away, and then fresh protective coatings are applied. These two aspects are denoted by sanding and sealing, respectively. It makes the old structure fresh and new once again.
Refinishing is a cost-effective, sustainable alternative to replacing floors. While refinishing preserves the existing structure, replacing requires removing the old boards and installing new timber.
Almost all types of houses with wood flooring require this treatment from time to time.
Why Should You Refinish Timber Floors Instead of Replacing Them?
Refinishing timber floors is better than replacement because it offers several benefits, such as cost-effectiveness, preservation of the original wood, and improved home value without raising the maintenance cost.
Ultimately, the concept of refinishing also represents sustainability, which helps meet current needs without compromising those of future generations. And it is also the best option for all single story house plans.
How Do You Know When Timber Floors Need Refinishing?
Before learning how to refinish wood floors, you must always carefully look for major signs of deterioration, such as scratches & dents, fading & discoloration, water stains, and dull surface finish.
- Scratches and dents: Ignoring minor damage or scuffs is fine, but never overlook numerous deep scratches or gouges.
- Fading and discoloration: Have your timbered floor panels turned yellowish or gray? This is common through prolonged exposure to UV rays from sunlight. It is also an indication for refurbishment to prevent further deterioration.
- Water stains: Dark spots, black rings, or cloudy “milky” marks are major signs of water intrusion or interference. Always ensure an expert opinion in this regard for confirmation.
- Dull surface finish: This is an effect when the top protective layer of the floor has been completely worn off, thus requiring repolishing for a renewed touch. It often happens with years-old residential construction projects.
Should You Test the Floor Before Refinishing?
Yes, testing before ensuring buffing timber floors is crucial, as it helps the owner learn for sure whether the floor really requires maintenance or it can wait. The water test is the best to reveal the condition.
- Put a tablespoon of water onto the surface of the floor and watch the results.
- If the water remains as it is and sits on top of the area without getting absorbed by the wood, that means the floor sealant is okay.
- Furthermore, if the water gets absorbed by the floor quickly, it means the finish is gone.
- The gradual absorption indicates that the finish or sealant is wearing thin.
Can All Types of Timber Floors be Refinished?
No. Not all timber floors can be refinished, as it depends on the thickness of the real wood layer. Let’s consider the suitability of refinishing timber floors with respect to solid hardwood floors, engineered timber floors, parquet flooring, and refinishing limits.
- Solid hardwood floors: They can be refinished 4 to 7 times.
- Engineered timber floors: Here, the refinishing depends on the veneer depth. A 2mm veneer allows for 1-2 light sandings, while 4mm–6mm can handle up to 5 refinishes. Avoid such maintenance in case the dimension is 1.5 mm.
- Parquet flooring: The rework can be done if the wood is solid or has a thick enough engineered veneer. Always consider an expert for its refinishing.
- Refinishing limits: It cannot be done if the wood above the tongue and groove has reached 3/32 inch or if the veneer is exhausted.
When is Recoating Better than Full Refinishing?
Consider the following table for a quick overview of when you should choose refinish wood floors over a recoating and vice versa. By the way, both are better in their respective situations.
| Key Considerations | When to choose recoating | When to choose full refinishing (Sanding) |
| What It Involves |
|
|
| Condition | Light surface scratches, minor scuffs, or dull, faded finish | Deep scratches, gouges, water stains, or severe discoloration |
| Finish Status | Intact stain and wood with a worn topcoat | Worn through to bare wood or damaged wood |
| Benefits |
|
|
What Tools and Materials are Needed to Refinish Timber Floors?
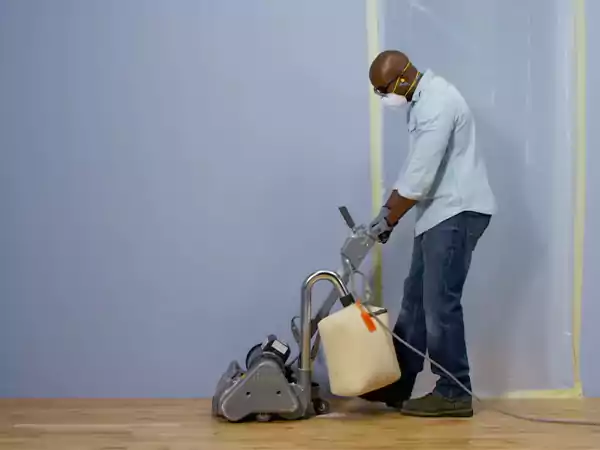
The following are the tools and materials needed for refinishing timber floors. These include sanding machines, sandpaper grits, wood filler, stains, sealants, and safety gear.
- Sanding Machines
Drum or Belt Sander - It is a large, heavy, walk-behind machine that uses a continuous loop of sandpaper (belt) or sanding sleeve (drum).
- This equipment is designed for deep sanding over large floors to flatten floorboards and strip old varnish or paint.
Edger Sander - It is a hand-held, rotary-disc machine, often called a “spinner.”
- This tool is used for sanding corners and edges along baseboards, where the large drum sander cannot reach.
Buffer (or Orbital Sander) - Buffer is a versatile tool that utilizes a rotating buffer pad.
- It is used for intermediate sanding, final fine finishing, smoothing, and blending the edges.
- Sandpaper Grits (Sanding is done in stages, moving from coarse to fine grits.)
Coarse (36–40 grit) These are heavy-duty, rough grits used for rapid material removal, such as stripping old paint, varnish, or stain from wood. Medium (60 grit) This is the grit that follows coarse sanding. It is typically used in removing marks left by coarser grits. Fine (80-120 grit) This range of grit is essential for preparing the wood for finishing. Sequentially, it is used for smoothing surfaces after medium grit. Sanding Screens (100-120 grit) These are open-mesh, abrasive discs or sheets coated with aluminum oxide. Such screens are often used for flattening, buffing, and cleaning surfaces.
- Wood Filler
Water-based These types of wood fillers are ideal for interior projects, as they dry fast and are easy to sand. Additionally, they also take stains well. Solvent/oil-based Such fillers are best for exterior repairs or when using oil-based stains. They are durable and resistant to moisture. Epoxy putty This type of wood filler is the most effective for structural repairs, as it dries very hard and thus can be drilled or planed for further strength building. Wood putty If there are small nail holes after finishing, wood putty is the most suitable filler to use. It dries slowly and remains flexible for a long period of time.
- Stains
Oil-based Wood Stain This stain penetrates deep into the wood for a rich color and ensures high durability, which is ideal for wood-grain enhancement. Water-based Wood Stain This type of stain forms a protective, breathable film on the surface. Water-based solutions provide more uniform, often matte or satin, finishes with better color retention over time.
- Sealants
Polyurethane Polyurethane sealants are the most common protective finish preferred by most of the professionals. They are available in both oil-based and water-based formulas. Applicators The common types of applicators used in refinishing timber floors are foam rollers, lambswool applicators, or paintbrushes. Each has its unique benefits or functions. Professionals know which one to use in which condition for max finishing.
- Safety Gear
Respirator Mask This gear is a must to protect against fine wood dust. Such dust particles deposit in the workers’ lungs through prolonged exposure without a proper mask. Safety Goggles Eyes are another delicate part of our body. Thus, its protection through safety goggles is also a must. Always use broad goggles for complete coverage. Hearing Protection As sanders are very loud, you must use noise-canceling buds or other protective devices for your safety. Others Knee pads and protective shoes can also be considered for added care.
What Safety Equipment is Required During Refinishing?
The major safety essentials while refinishing wood floors include a high-quality respirator (N95 or better) for dust and VOCs, safety googles, ear protection (plugs/muffs), and knee pads. These tools protect the worker from various types of dangerous objects.
While ensuring this gear, make sure that you focus on the quality. Don’t purchase cheap protective wear, as it will not provide 100% safety and will put the operator of the heavy sanding machines at risk.
How Do You Prepare a Room Before Refinishing Timber Floors?
Consider the following 7-step process that you need to follow to prepare a room before refinishing timber floors. This involves clearing the area, removing old flooring/trim, inspecting & repairing, securing nails, sealing gaps, cleaning thoroughly, and final prep.
- Clear the area: Remove everything from the room placed on the floor and hung on the walls.
- Remove old flooring/trim: Remove existing carpet, padding, staples, and linoleum. Also, take away the base shoe molding to make the baseboards accessible.
- Inspect & repair: Check for damaged or warped boards and replace them.
- Secure Nails: Hammer down protruding nails, if any, so that they don’t damage the sander.
- Seal Gaps: Use wood filler and fill large gaps between boards.
- Clean Thoroughly: Take the cleaning equipment to sweep and vacuum the entire floor.
- Final Prep: Make sure there is no visible dust, grit, or debris on the floor. After that, let it dry.
Should You Remove Baseboards and Molding Before Sanding?
Yes, you should remove the baseboards. Doing so is highly recommended during hardwood floor refinishing. It allows the sanding equipment to reach the very edge of the walls for a consistent, professional finish. However, don’t forget to label the moldings so that you can easily reinstall them.
How Do You Prevent Dust From Spreading During Sanding?
There are multiple ways of preventing dust from spreading during refinish hardwood floors. In short, these techniques are as follows:
- Sealing doorways
- Sealing HVAC vents
- Sealing other openings
- Turning off HVAC
- Using modern equipment
All of these are major outlets from where the dust will escape. Thus, sealing or blocking them is the best strategy.
What are the Step-by-Step Instructions for Refinishing Timber Floors?
Refinishing timber floors is a multi-step process in which the worn, scratched, or dull flooring is restored through sanding, staining (optional), and sealing. Mini steps involved here are to prepare the room, rough sanding, edge sanding, medium & fine sanding, fill gaps, do screening/buffing, clean dust, stain (optional), apply finish, and cure.
These steps are briefly explained below.
- Prepare the room
- Remove all furniture, rugs, and base moldings.
- Hammer down protruding nails.
- Seal air vents.
- Use plastic sheets to close off doorways to prevent dust from spreading to other rooms.
- Rough sanding
- Use a drum or belt sander with 36–40 grit sandpaper to remove the old finish and flatten the floor.
- Move in the direction of the wood grain.
- Edge sanding
- Start the edging machine with the same 36–40 grit.
- Use it to reach the corners and walls.
- Medium & fine sanding
- Repeat the entire room (main area and edges) with 60-grit.
- Then, again with 100–120 grit, remove scratches from previous passes.
- Fill gaps
- Use wood filler for holes, cracks, or gaps.
- Allow it to get completely dry.
- Do screening/buffering
- Arrange for a buffer with a 100–120 grit screen.
- Use it to smooth the entire floor.
- Blend edge and drum sander marks.
- Clean dust
- Vacuum the entire floor thoroughly.
- Then, use a tack cloth for complete, microscopic dust removal.
- Stain (optional)
- Apply wood stain to achieve the desired color.
- Wipe off all excess.
- Leave it to get completely dry.
- Apply finish
- Apply 3–4 coats of polyurethane sealer.
- Ensure light sanding between coats.
- Cure
- Allow the finish to dry-cure fully.
- It typically takes 24 hours to walk on or even days to weeks for full hardness.
How Do You Sand Timber Floors Properly?
For sanding hardwood floors properly, there is a strict progression of grits to avoid scratches and ensure a final smooth result. The right process involves 36–40 (Coarse) ➡️ 60 (Medium) ➡️ 100–120 (Fine). Use a drum sander for the main floor. Also, make sure that you move with the grain and overlap passes by at least ⅓ the belt width.
Should You Use an Edge Sander for Corners and Walls?
Beginners learning how to refinish wood floors often ask such a question. Yes, an edger sander (or edge machine) is required for the 4-to-6-inch perimeter that the drum sander cannot reach. For tight corners that even the edge machine cannot reach. Thus, for that, use a scraper or manual hand sander.
What is Screen Sanding and Why is it Important?
Screen sanding is the final smoothing step, using a buffer with a fine mesh screen, usually 100–120 grit. This step in buffing timber floors is crucial, as it removes tiny scratches from previous sandings, levels the floor, and ensures a perfectly smooth surface for the finish.
How Do You Remove Dust After Sanding?
Removing the dust after sanding in the process of refinishing timber floors is very simple. Take a functional vacuum and thoroughly clean the floor, including corners and baseboards. Use a brush attachment for extra perfection. For the finest dust particles, use a tack cloth.
Should You Stain Timber Floors Before Sealing?
It is not mandatory but rather an optional step in the refinish wood floors process. If you want a darker color or want to enhance the grain, use stain after the final sanding and cleaning, but before the seal coats. Before staining, never forget to test in a small area to check if you like the final results.
How Do You Apply the Final Protective Finish?
While refinishing timber floors, it is also crucial to properly apply the final protective finish. Apply the sealer using a high-quality applicator, such as a lambswool applicator for oil-based or a T-bar/roller for water-based. Also, don’t forget to work with the grain at the same time.
The right technique in this regard is to start in a corner, cutting in edges with a brush, and working in 5-foot swaths, ultimately moving towards the exit.
How Many Coats of Finish Should You Apply?
Majorly, it depends on the intensity of traffic. If it is a high-traffic area, at least 3 to 4 coats of polyurethane are recommended. Furthermore, in the case of oil-based polyurethane, 2 to 3 coats are generally enough. That principle also applies to hardwood floor refinishing.
Should You Sand Between Finish Coats?
Yes, in the process of refinish hardwood floors, light sanding, also called denibbing or scuff sanding, between coats is necessary for a smooth finish. It might be avoided to save some cost, but for extra smoothness, most project owners prefer it.
Also Read: 19 Steps to Building a House – Construct Your Dream Living Space With Precision
What is the Best Finish for Timber Floors?
Go through the comparison table below and learn which is the best finish choice for refinishing timber floors. The table takes oil-based polyurethane, water-based polyurethane, and natural oil finishes into consideration.
| Features | Oil-Based Polyurethane | Water-Based Polyurethane | Natural Oil Finishes |
| Appearance | Warm amber glow; very hard, thick protective layer | Completely clear & doesn’t yellow | Matte, “raw wood” look |
| Durability | Highly resistant to moisture and high foot traffic | Nearly as durable as oil-based alternatives | Less scratch-resistant |
| Maintenance | 7-10 years | 5-7 years | Requires periodic re-oiling |
Based on these comparison points, you can make your decision and choose the right finish that suits your refinishing needs better.
What is the Difference Between Satin, Semi-Gloss, and Gloss Finishes?
Consider the key differences between satin, semi-gloss, and gloss finishes below before you think of sanding hardwood floors in your house.
- Satin: Provides a soft, pearl-like, velvety sheen with moderate durability. However, it is less stain-resistant and harder to clean than higher sheens.
- Semi-Gloss: Has a sleek, luminous shine with high durability and moisture resistance; perfect for trim, doors, kitchens, and bathrooms. It handles heavy cleaning easily.
- Gloss Finishes: Offers the highest sheen with maximum durability, making it a popular choice for refinishing timber floors. Although it is easy to clean, its extremely reflective nature highlights even the minor imperfections very easily.
How Long Does it Take to Refinish Timber Floors?
Refinishing timber floors typically takes 3 to 5 days, which includes the active work and a curing period.
For sanding time, 1 to 2 days are at least required for an average home, where the work often includes rough, medium, and fine-grit sanding. And, for the drying & finishing time, 1 to 3 days are a must. However, the exact duration varies depending on the nature of the finish used.
When Can You Walk on the Floor After Refinishing?
For light walking or traffic, at least give it 24 to 48 hours. However, the full cure period is 7 to 30 days.
After you have learned how to refinish wood floors, knowing about the curing period is also important. It is the time that you have to give to the refinishing to get completely settled before you can start walking on it.
How Much Does It Cost to Refinish Timber Floors?
Nationally, the average cost for refinishing timber floors is $1,883, within the commonly prevalent range of $1,101 to $2,666. However, the actual costs are bound to vary as per multiple factors, mainly the complexity of the work and others.
Furthermore, average costs per square foot range from about $3 to $8.
What Factors Affect the Total Refinishing Cost?
While discussing buffing timber floors, looking at the factors that affect the total refinishing cost is also crucial. Major cost-influencing factors are room size, hardwood flooring type, local labor costs, and others, such as moving furniture, removing carpet, flooring, repairs, and cleanup.
Is It Better to DIY or Hire a Professional?
Are you confused about which option is better while refinishing timber floors, like whether you should choose to take it as a DIY project or hire a professional? Consider the table below for genuine insights.
| DIY Refinishing Works Better When | Professional Help Works Better When |
| 1. The project is small. | 1. The project is large. |
| 2. You have high-level hardiness. | 2. Floors are heavily damaged. |
| 3. Floors are in good condition. | 3. The flooring is valuable. |
| 4. Time is flexible. | 4. You need a flawless finish. |
Also Read: Choice Home Warranty Prices in 2026: Plans, Costs & Is It Worth It?
Conclusion
Refinishing timber floors is the most preferred option over replacement due to its cost-effectiveness and sustainability. This process involves two phases, namely sanding and sealing.
However, before you take action, make sure your timber flooring really needs maintenance. Ask for an expert opinion if possible. It is always better to wait and know from a learned professional than to decide for yourself, acting in haste, often wasting limited resources.
FAQs
Q: What is the best way to refinish a wood floor?
Q: Is it worth it to refinish wood floors?
Ans: Yes. It is worthwhile, as it will renew the look of your floor as it was when originally installed.
Q: Can you restain old hardwood floors without sanding?
Ans: Yes, it is possible using a “buff and coat” method, also known as screening.
Related Posts